Configuration
The Configuration tab is where you connect CitraSense to the Citra Space platform, register every sensor attached to this ground station, tune observation and processing settings, and set up automated operations.
The page has a vertical side navigation on the left, split into two sections:
- Site — settings that apply to the whole ground station: API connection, Time & Location, Pipeline, Safety, Advanced.
- Per-sensor — one collapsible group per sensor on this host (Hardware, Observation, Processing, Autofocus, Calibration, Robotic, Safety). Each sensor’s row in the nav has its own trash icon to remove it. The + Add Sensor button at the bottom of the nav lets you register a new telescope, all-sky camera, or staring camera.
Your last-selected tab is remembered across sessions. Changes across every tab are saved together with the Save Configuration button fixed at the bottom of the page.
Only the tabs that apply to the active sensor’s modality are shown. A streaming sensor, for example, only shows its Hardware tab — observation, processing, and robotic-session settings don’t apply.
API
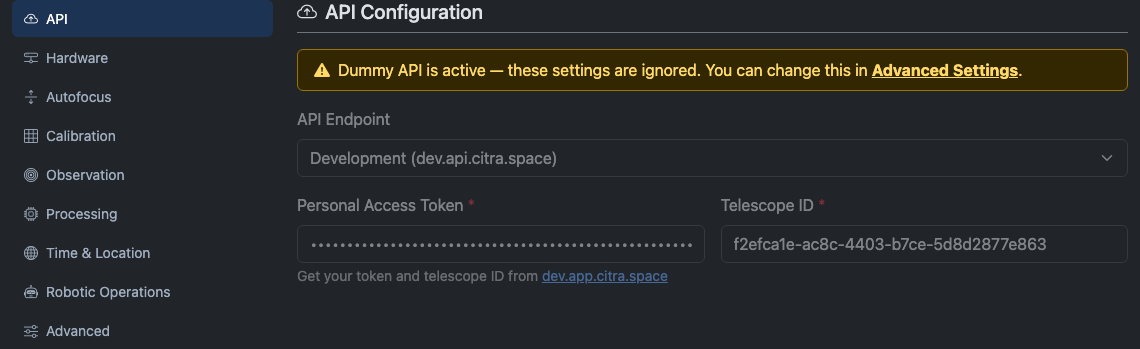
The API tab connects CitraSense to the Citra Space backend. All task polling, filter synchronization, and observation uploads go through this connection.
| Setting | Description |
|---|---|
| API Endpoint | Which Citra API server to use. Choose Production for live operations or Development for testing. Select Custom to enter your own host, port, and SSL settings. |
| Personal Access Token | Your authentication token for the Citra API. Generate one from your account on the Citra Space web app. |
| Telescope ID | The UUID of your telescope as registered on Citra Space. Find it in your telescope’s settings page on the web app. |
Both the token and telescope ID are required fields.
When Dummy API mode is enabled, a warning banner appears on this tab and the fields are dimmed. The settings are still saved but will not be used until you disable Dummy API mode in the Advanced tab.
Hardware
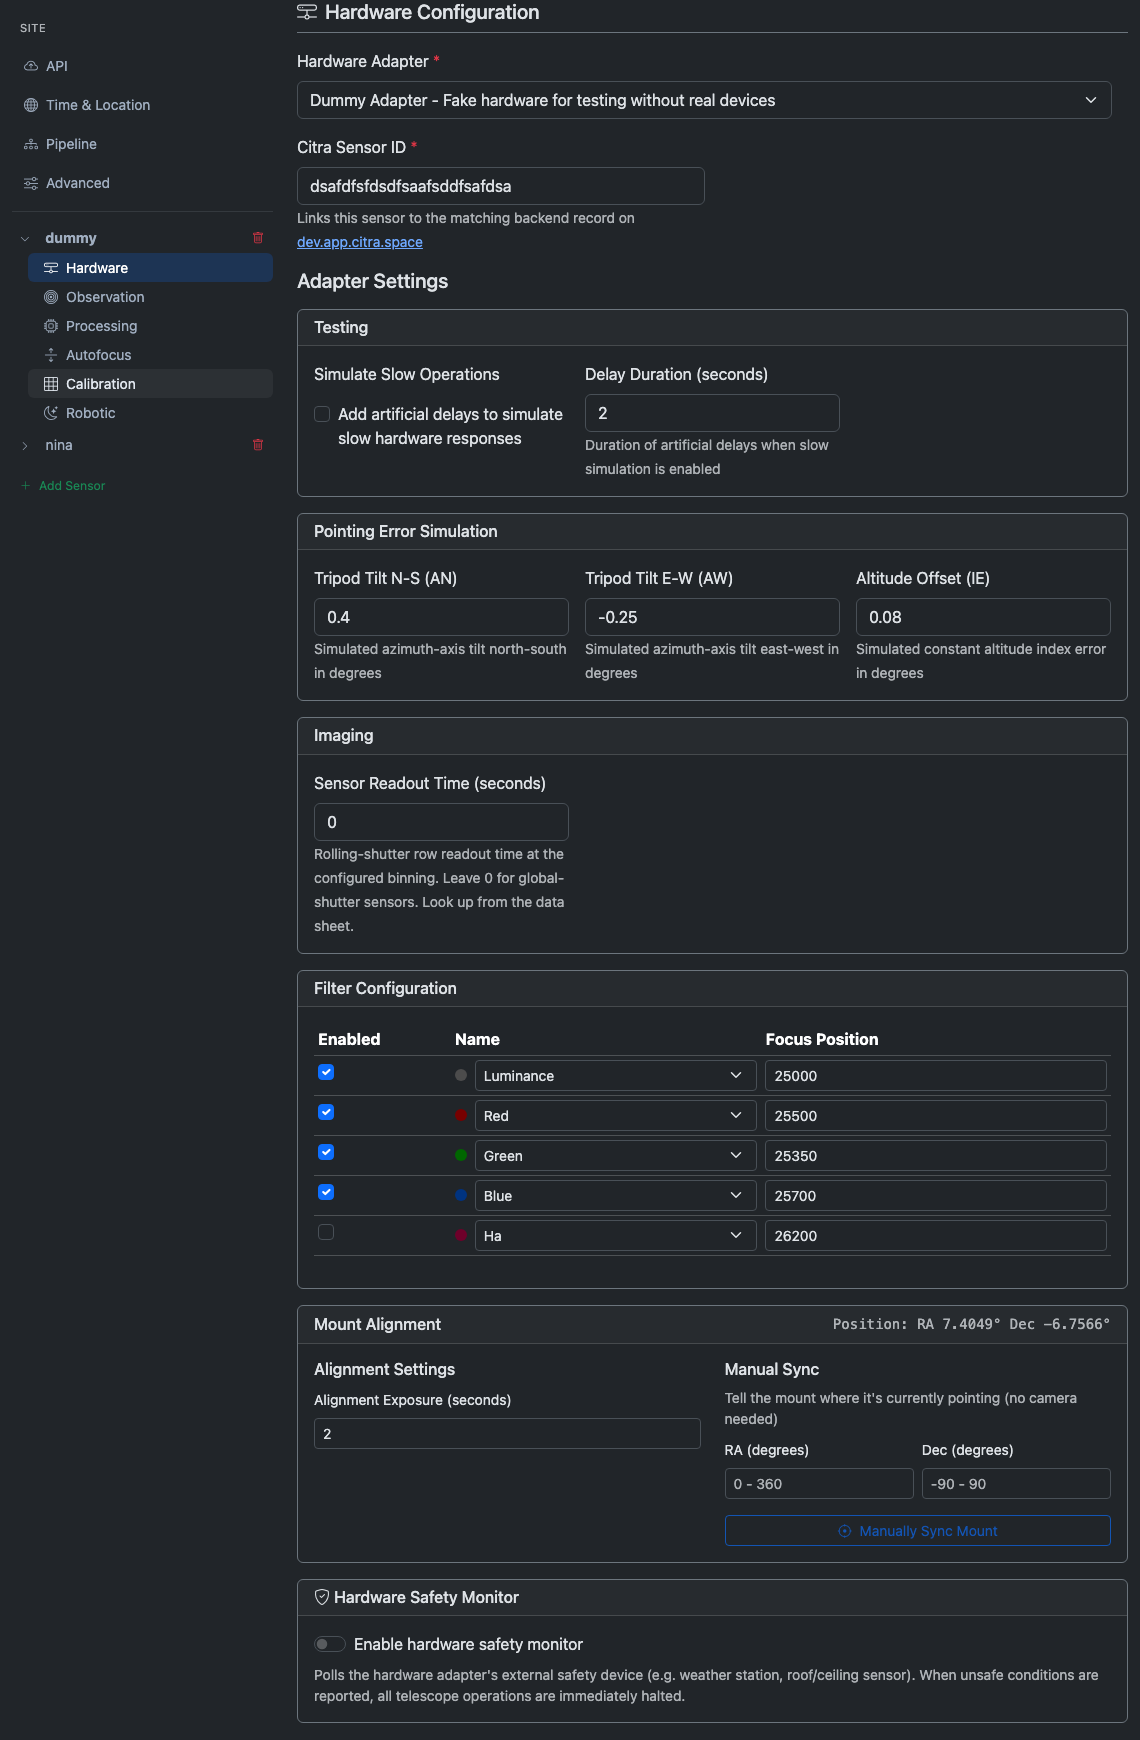
The Hardware tab configures the selected sensor’s hardware. It is per-sensor: each sensor in the side nav has its own Hardware tab, and changing the adapter or settings here only affects the active sensor.
Citra Sensor ID
Every sensor needs a Citra Sensor ID — the UUID of the matching record registered on Citra Space. Observation uploads use this ID to attach results to the correct backend record. The field links to the Citra Space app so you can copy the UUID from your account page.
Adapter Selection (telescope sensors)
Telescope sensors require a hardware adapter. Choose one from the dropdown:
- Direct Hardware — CitraSense controls devices natively (ZWO cameras, Moravian cameras, ZWO EAF focuser, ZWO AM5/AM7 mounts, Rainbow Astro RST-135E mounts, USB cameras, Ximea cameras)
- N.I.N.A. Advanced API — Connects to a running N.I.N.A. instance over its HTTP/WebSocket interface
- KStars / Ekos — Connects to KStars via D-Bus
- INDI — Connects to an INDI server directly
- Dummy Adapter — Simulated hardware for testing without real devices
For the Direct adapter, a Scan Hardware button appears to re-enumerate USB devices, serial ports, and cameras.
Streaming sensors (all-sky, staring) do not use the hardware adapter dropdown — they carry all their per-sensor configuration in their adapter settings card below.
Detection Backend (staring sensors)
Staring sensors choose how captured FITS frames are turned into satellite observations. The Detection backend dropdown on the Hardware tab has two options:
| Option | What it does |
|---|---|
| On-device optical pipeline (default) | CitraSense runs plate-solve → source extraction → satellite matching locally on the host, the same way the telescope sensor does, and uploads matches itself. No external service required. Good fit for Raspberry Pi deployments where you want the staring camera to be self-contained. |
| target_acquired (external matched-filter via NATS) | Hands the captured FITS files to an external target_acquired subscriber running a matched-filter detector. Better for very dim sources at known positions, but requires the target_acquired service to be reachable over NATS. |
When On-device optical pipeline is selected, the NATS connection fields (URL, catalog seeding, refresh interval) are hidden — the on-device pipeline doesn’t need them. The Ping and Reseed catalog controls on the staring sensor detail page also disappear, since they only apply to the target_acquired link.
Live Bus Pills (staring sensors, target_acquired backend)
When the target_acquired backend is selected, a row of Live pills at the top of the Hardware tab shows the bus state and the linked target_acquired daemon’s state. Green means the bus is connected and the daemon is running; yellow means stale or awaiting catalog; red means offline or in error.
Adapter Settings
Each adapter exposes its own settings grouped into cards. These are generated dynamically based on the selected adapter. For example, the N.I.N.A. adapter shows connection host and port fields, while the Direct adapter shows device selection dropdowns for each hardware component.
If any system dependencies are missing for the selected adapter (like INDI or D-Bus libraries), a warning alert lists them with install commands.
Filter Configuration
Once you save with an adapter selected, the filter configuration card appears. It shows each filter position reported by your hardware with:
| Column | Description |
|---|---|
| Enabled | Whether this filter is available for observations. Disabled filters are skipped during characterization sequences. |
| Name | The filter’s name. Choose from standard presets (Johnson-Cousins UBVRI, Sloan ugriz, Clear, Luminance) or enter a custom name. A colored dot shows the filter’s display color. |
| Focus Position | The focuser step position for this filter. When switching filters, CitraSense moves the focuser to this position to compensate for filter-specific focus offsets. |
Mount Alignment
This card appears when the adapter supports alignment or manual sync operations.
- Alignment Exposure — The exposure duration (in seconds) used when plate solving for pointing model calibration.
- Manual Sync — Enter a known RA and Dec (in degrees) and click Manually Sync Mount to tell the mount where it is pointing. Useful when the mount has no encoder feedback after power-on.
Hardware Safety Monitor
When the adapter supports an external safety device (weather station, roof sensor, etc.), a toggle appears to enable or disable the hardware safety monitor. When enabled, CitraSense polls the safety device and halts all operations if unsafe conditions are reported.
Operating Window (staring sensors)
Staring camera sensors have an Operating Window card on their Hardware tab. The Darkness Threshold dropdown lets you pause the capture loop while the sun is above a chosen altitude (Civil, Nautical, or Astronomical twilight), or Always (testing) to bypass the gate for daytime smoke tests. The window uses the same per-sensor setting as the telescope robotic session.
Autofocus
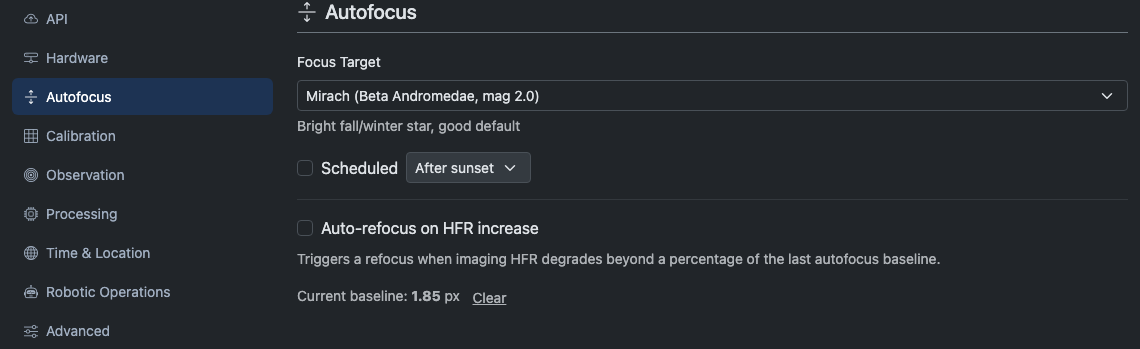
The Autofocus tab configures automatic focus management. It only appears when the selected hardware adapter supports autofocus.
Focus Target
Choose where the telescope slews before running autofocus. Presets include bright stars chosen for different seasons (e.g., Mirach for fall/winter, Arcturus for spring). Select Custom RA/Dec to enter your own coordinates in degrees.
Scheduled Autofocus
| Setting | Description |
|---|---|
| Scheduled | Enable or disable automatic autofocus runs. |
| Schedule Mode | Interval runs autofocus every N minutes (30 min to 24 hours). After sunset runs autofocus once at a fixed offset after sunset. |
When a scheduled run is pending, the tab shows a countdown to the next autofocus.
Auto-Refocus on HFR Increase
This feature monitors the Half-Flux Radius (HFR) of stars in captured images and triggers a refocus when image quality degrades.
| Setting | Description |
|---|---|
| Trigger at % increase | How much HFR must rise above the baseline before triggering (10–200%). |
| Sample window | Number of recent frames to average when computing the current HFR (3–20). |
| Current baseline | The HFR value from the last successful autofocus. Click Clear to reset it, which forces a fresh autofocus on the next opportunity. |
Calibration
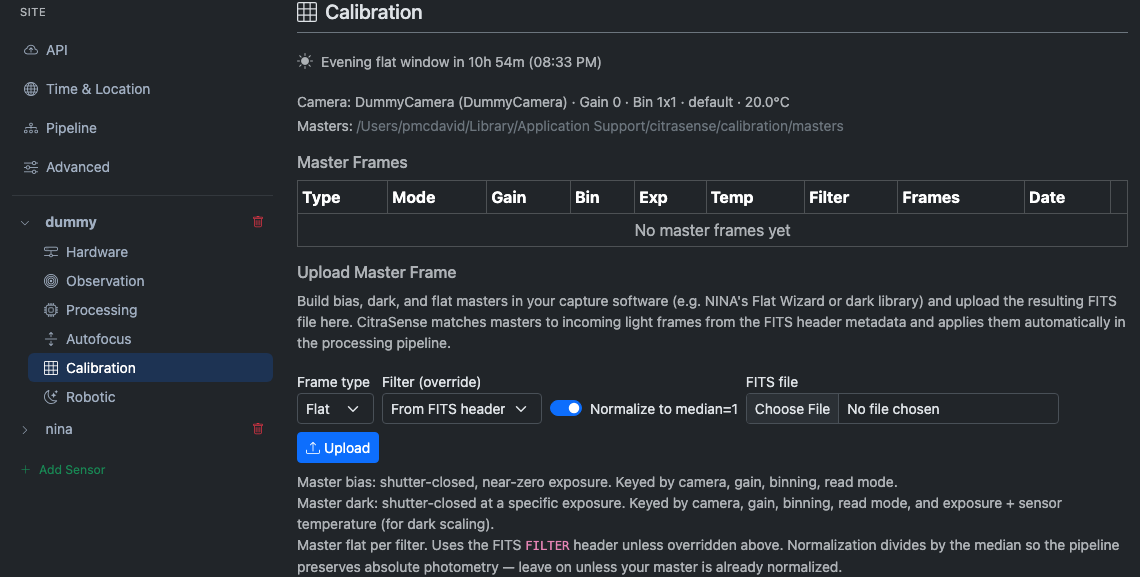
The Calibration tab lets you capture and manage calibration frames (bias, dark, and flat masters). It only appears when the selected adapter supports direct camera control.
If the current adapter does not support direct camera control, this tab shows “Calibration is not available for the current hardware configuration.”
When available, the Calibration tab shows:
- Camera info — Model, sensor ID, gain, binning, and temperature
- Masters directory — Where calibration masters are stored on disk
- Readiness status — Green checkmark when bias, dark, and flat masters all exist; otherwise a warning lists which are missing
- Master frames table — Lists existing masters with download and delete options
Capturing Frames
Choose a frame type (bias, dark, or flat), set the exposure duration (for darks and flats), and select the filter (for flats). Click Capture to begin. A progress bar shows the current frame and overall batch progress.
One-Click Suites
For convenience, the tab offers batch capture buttons:
- Calibrate Bias & Dark — Captures a set of bias frames followed by dark frames at the current exposure setting
- Calibrate All Flats — Captures flat frames for every enabled filter
You can configure how many frames to capture per type with the Bias/Dark frame count and Flat frame count fields.
Automated Flats (N.I.N.A.)
When the active adapter is N.I.N.A. and the connected profile has a trained Flat Wizard, an Automated Flats section appears. Exposures and panel brightness come from the trained N.I.N.A. profile — CitraSense triggers the wizard per-filter, downloads the frames, and stacks them into masters.
- Run Flat Wizard runs the wizard immediately for every enabled filter.
- The Automatically capture flats during flat windows switch turns on hands-off flat capture. Pair it with a Capture every interval (every flat window, daily, or a longer cadence) to refresh masters on a schedule without operator action.
Observation
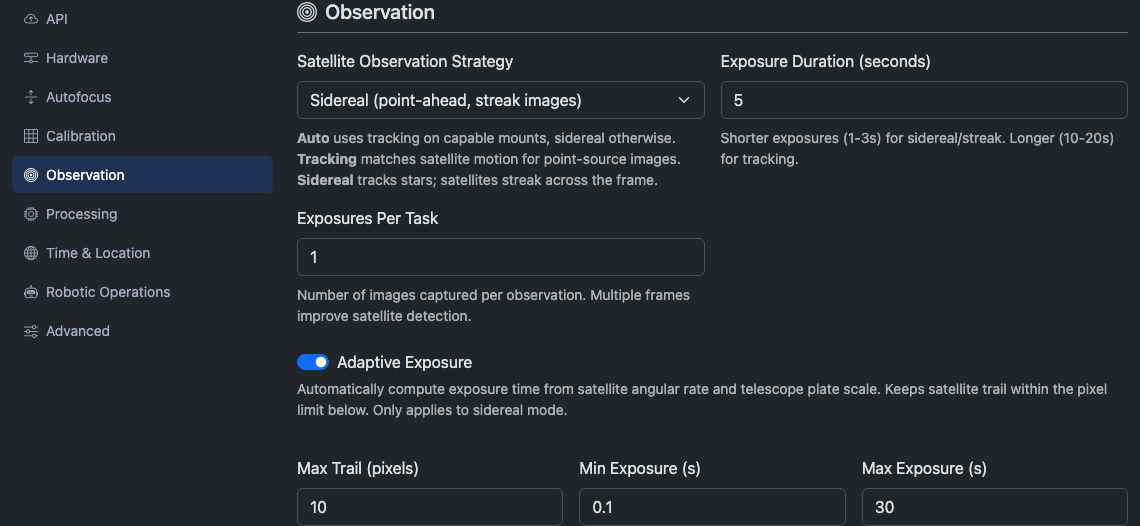
The Observation tab controls how CitraSense images satellites.
| Setting | Description |
|---|---|
| Satellite Observation Strategy | How the telescope tracks during capture. Auto lets CitraSense decide per-task based on the satellite’s apparent motion. Tracking matches the mount’s motion to the satellite for point-source images. Sidereal holds the mount on the sky background, producing a satellite streak. |
| Exposure Duration (seconds) | How long each frame is exposed (0.01–300 seconds). Shorter exposures (1–3s) work well for sidereal/streak mode. Longer exposures (10–20s) work better for tracking mode. |
| Exposures Per Task | Number of frames captured per observation task (1–50). Multiple frames improve satellite detection reliability. |
| Adaptive Exposure | When enabled, CitraSense computes the exposure time automatically based on the satellite’s angular rate and your telescope’s plate scale, instead of using the fixed Exposure Duration above. The goal is to keep the satellite trail within the pixel limit you configure. Only applies to sidereal (streak) mode. |
When Adaptive Exposure is enabled, three additional settings appear:
| Setting | Description |
|---|---|
| Max Trail (pixels) | The maximum satellite trail length in pixels. CitraSense shortens the exposure to stay within this limit for fast-moving targets. |
| Min Exposure (s) | The shortest exposure the adaptive algorithm will use, even for very fast satellites. |
| Max Exposure (s) | The longest exposure the adaptive algorithm will use, even for very slow targets. |
Processing
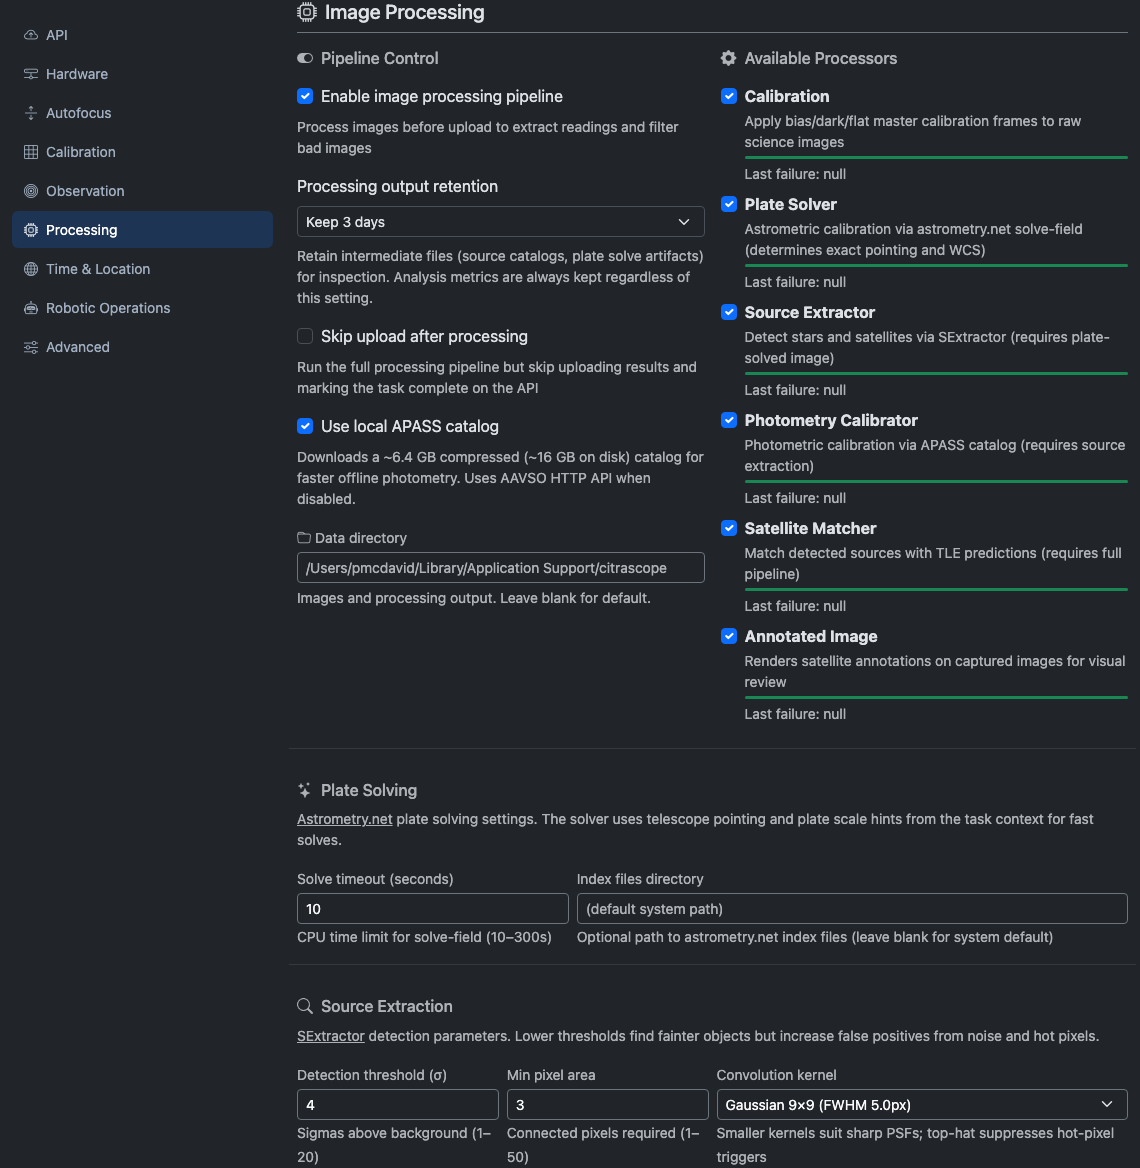
The Processing tab is per-sensor. It controls the image processing pipeline that runs after each capture for this telescope.
Pipeline Control
| Setting | Description |
|---|---|
| Enable image processing pipeline | Master switch for the entire pipeline. When off, captured images are uploaded raw. |
| Skip upload after processing | Run the full pipeline locally but do not upload results to the API. Useful for offline testing. |
Site-wide pipeline storage settings (retention, local APASS catalog, data directory) live on the site-level Pipeline tab.
Available Processors
Each processor in the pipeline can be individually enabled or disabled:
| Processor | What it does |
|---|---|
| Calibration | Applies bias, dark, and flat master frames to raw science images. |
| Plate Solver | Determines exact pointing and WCS via astrometry.net’s solve-field. |
| Source Extractor | Detects stars and satellites in the plate-solved image using SExtractor. |
| Photometry Calibrator | Cross-matches extracted sources against the APASS catalog and computes photometric zero-points. |
| Satellite Matcher | Matches detected sources to predicted satellite positions from TLE propagation. |
| Annotated Image | Renders an overlay JPEG with satellite annotations for visual review. |
Each processor shows a success/failure progress bar when statistics are available, along with the last failure reason if one occurred.
Source Extraction
These settings control how SExtractor detects stars and satellites in each image. Lower thresholds find fainter objects but increase false positives from noise and hot pixels.
| Setting | Description |
|---|---|
| Detection threshold (σ) | How many sigma above the background an object must be to be detected (1–20). Lower values find fainter streaks; higher values reduce noise detections. |
| Min pixel area | Minimum number of connected pixels required to count as a real detection (1–50). Increase this to suppress hot-pixel triggers. |
| Convolution kernel | The filter applied before detection. Smaller Gaussian kernels (3×3) suit sharp, undersampled PSFs. Larger kernels (5×5, 9×9) help with well-sampled or defocused stars. Top-hat kernels suppress single hot-pixel noise while preserving point sources. |
The Auto-Tune tool in the Analysis tab can sweep parameter combinations automatically and suggest the best settings for your telescope.
Plate Solving
| Setting | Description |
|---|---|
| Solve timeout (seconds) | Maximum CPU time allowed per solve attempt (10–300 seconds). |
| Index files directory | Path to astrometry.net index files. Leave blank to use the system default. |
Pipeline
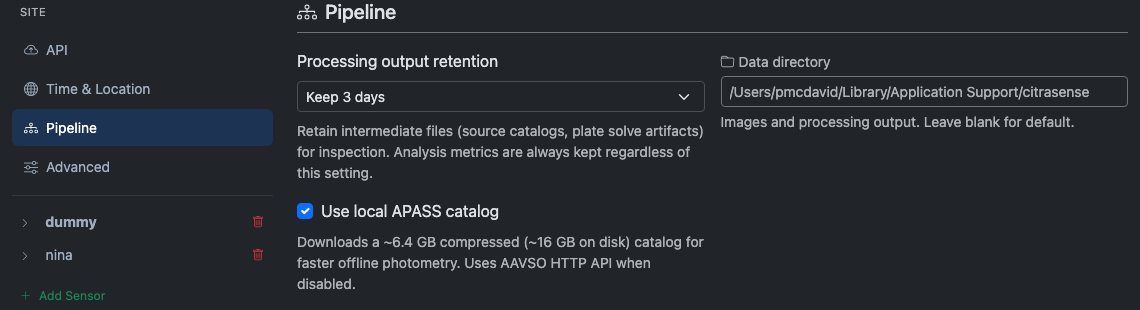
The Pipeline tab is a site-level tab that controls where processing output lives and how long it sticks around.
| Setting | Description |
|---|---|
| Processing output retention | How long to keep intermediate pipeline files (source catalogs, plate-solve artifacts) on disk. Options: Delete immediately (default), 6 hours, 24 hours, 3 days, 7 days, or Keep forever. Analysis metrics are always kept regardless of this setting. |
| Use local APASS catalog | Use a locally downloaded copy of the APASS photometric catalog (~6.4 GB compressed, ~16 GB on disk) instead of querying the AAVSO HTTP API. Faster and works offline. |
| Data directory | Where images and processing output are stored. Leave blank for the platform default. |
Retention controls how long bundles stay available for Analysis tab reprocessing. Delete immediately disables reprocessing — once a task finishes, its bundle is gone.
Safety
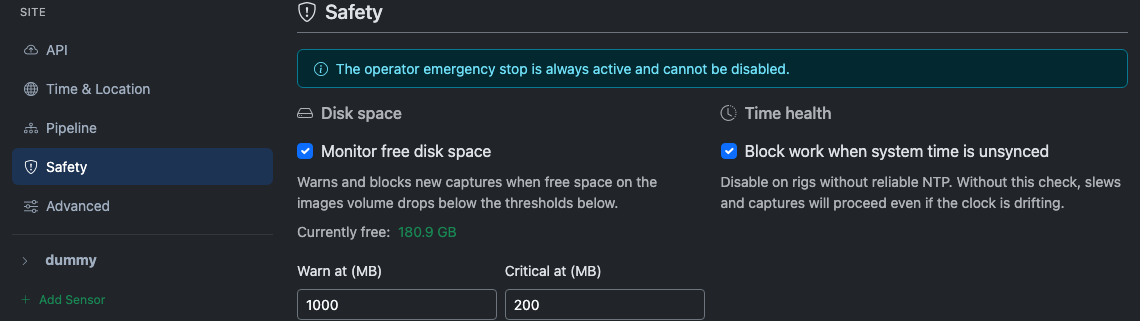
The Safety tab is a site-level tab that controls which automated checks halt operations and at what thresholds. The operator emergency stop is always active and cannot be disabled here.
When a check trips, CitraSense pauses imaging across every sensor and surfaces a banner under the status bar. The status bar’s Safety badge summarizes the aggregate state.
Disk space
| Setting | Description |
|---|---|
| Monitor free disk space | Master toggle for the disk-space check. When off, the check is not registered and disk-space alerts will never fire. |
| Warn at (MB) | Free space (in megabytes) on the images volume below which the Safety badge goes yellow. Imaging continues. |
| Critical at (MB) | Free space below which imaging is paused. Must be lower than the Warn threshold. |
The form shows the current free space below the toggle, colored by the live check state. While the daemon is still computing the first reading, a “Waiting for first reading…” hint appears in its place.
Time health
When Block work when system time is unsynced is on, CitraSense pauses imaging if measured clock drift exceeds the threshold on the Time & Location tab. Disable on rigs without reliable NTP — without this check, slews and captures will proceed even if the clock is drifting.
Time & Location
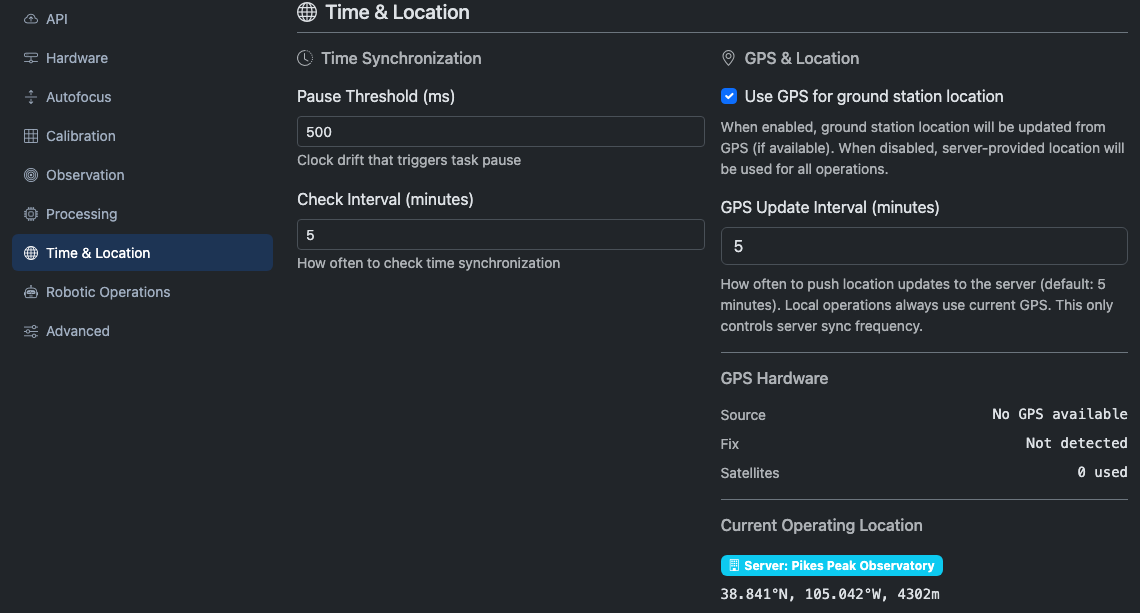
The Time & Location tab configures clock synchronization and ground station positioning.
Time Synchronization
Accurate timestamps are critical for satellite matching. CitraSense periodically checks the system clock against a reference and pauses operations if drift exceeds a threshold.
| Setting | Description |
|---|---|
| Pause Threshold (ms) | Maximum allowed clock drift in milliseconds (1–10,000). If the measured offset exceeds this, task processing pauses until the clock is corrected. |
| Check Interval (minutes) | How often to check time synchronization (1–60 minutes). |
GPS & Location
| Setting | Description |
|---|---|
| Use GPS for ground station location | When enabled, CitraSense reads position from a connected GPS receiver (common on Raspberry Pi deployments). When disabled, the server-provided ground station location is used. |
| GPS Update Interval (minutes) | How often to push GPS location updates to the server (1–1,440 minutes). Local operations always use the current GPS fix; this controls how often the server record is synchronized. |
When GPS is enabled, the tab shows diagnostic information:
| Field | Description |
|---|---|
| Source | The GPS device path or “No GPS available” |
| Fix | Current GPS fix coordinates or “Not detected” |
| Satellites | Number of GPS satellites in use |
Current Operating Location
The bottom of the tab shows the active location source:
- GPS (green badge) — Using a live GPS fix
- Server (blue badge) — Using the ground station position registered on Citra Space
- No location (red badge) — No location available; satellite matching may be less accurate
When both GPS and a server-provided position are available, the tab shows both and warns if they diverge by more than 1 km.
Robotic

The Robotic tab configures the automated nightly session for a telescope sensor. It is per-sensor: each telescope can run its own robotic schedule.
These settings control what happens automatically at the start and end of each observing night.
| Setting | Description |
|---|---|
| Darkness Threshold | The sun altitude that defines “dark enough to observe.” Choose Civil Twilight (−6°), Nautical Twilight (−12°), or Astronomical Twilight (−18°). The observing session begins when the sun drops below this altitude and ends when it rises above it. |
| Calibrate pointing model at start of night | Plate-solve a known star to calibrate the mount’s pointing model before the first task. |
| Autofocus at start of night | Run autofocus before the first observation of the session. |
| Alignment at start of night | (Coming soon) |
| Unpark at dusk / Park at dawn | Automatically unpark the mount when the session begins and park it when the session ends. |
Observation tasks are assigned by the Citra Space scheduler. To control what your telescope is asked to observe, configure your tasking preferences on the Citra Space web app.
Safety (per-sensor)
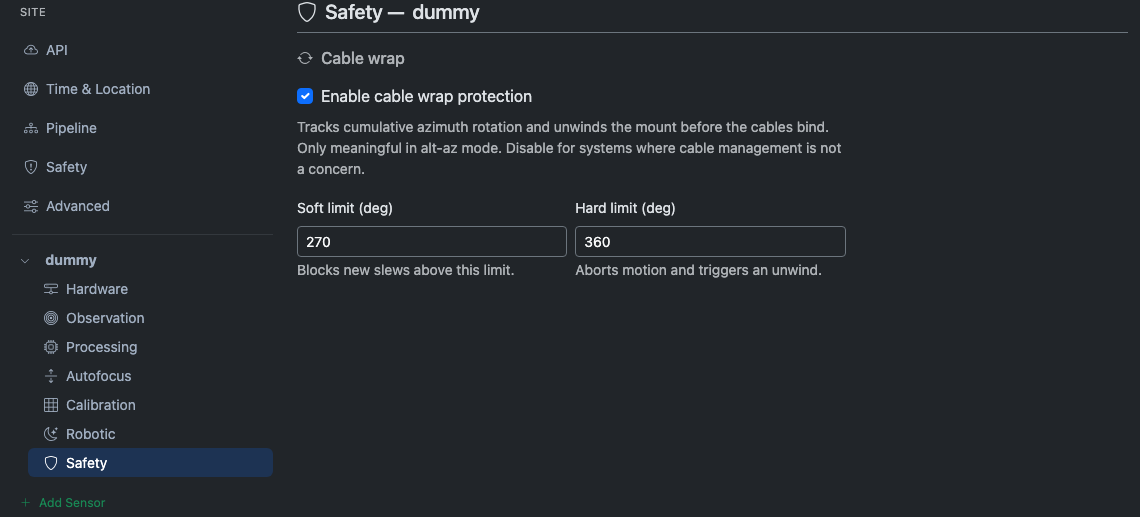
The per-sensor Safety tab holds checks that only make sense for one sensor at a time. Today this is the cable wrap monitor for telescope sensors that drive the mount directly (Direct Hardware and Dummy adapters). It does not appear for N.I.N.A., KStars/Ekos, or INDI adapters because cable management is handled by the host application in those configurations.
Cable wrap
| Setting | Description |
|---|---|
| Enable cable wrap protection | Master toggle. When off, CitraSense will not block slews or trigger unwinds based on azimuth rotation. |
| Soft limit (deg) | Cumulative azimuth rotation (in degrees) above which new slews are blocked. The Monitoring tab shows a yellow cable-wrap pill on the sensor’s hero card. |
| Hard limit (deg) | Rotation at which CitraSense aborts the current motion and triggers an unwind. Must exceed the soft limit. |
Cable wrap only meaningfully applies to alt-az mounts. Telescope sensors whose mounts don’t expose an azimuth axis (e.g. equatorial fork mounts) silently disable the check regardless of this toggle.
To manually clear an active wrap warning, use the Reset cable wrap control on the Telescope sensor detail page.
Advanced
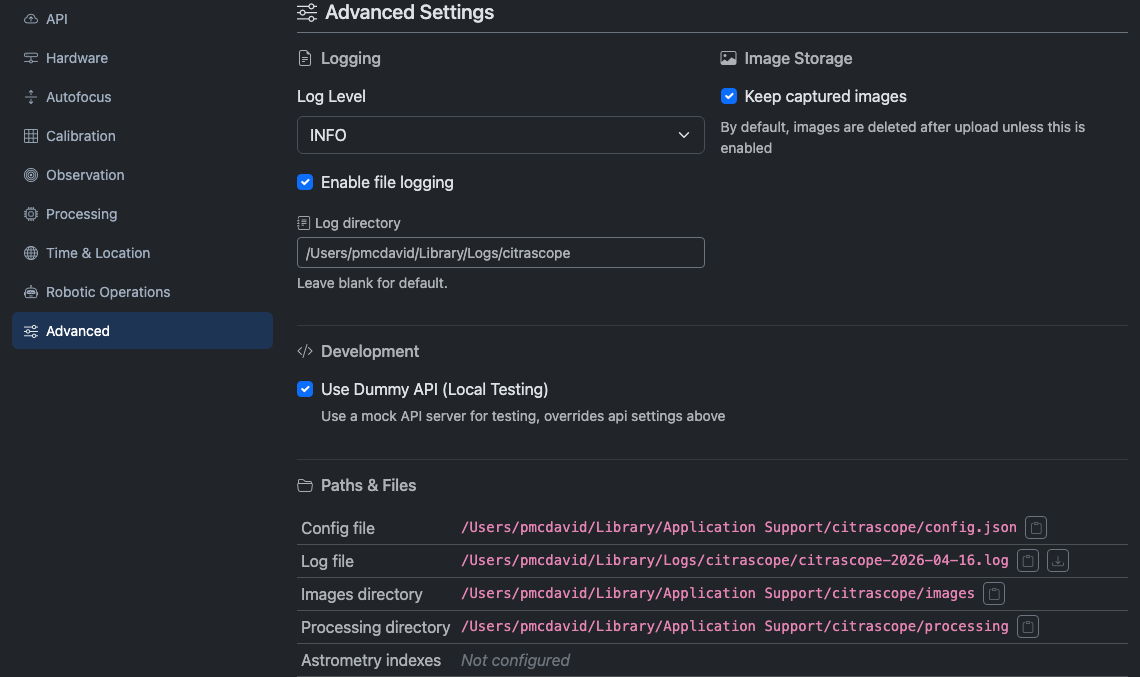
The Advanced tab holds logging, storage, and development settings.
Logging
| Setting | Description |
|---|---|
| Log Level | Verbosity of log output: DEBUG, INFO, WARNING, or ERROR. INFO is recommended for normal operations; DEBUG is useful for troubleshooting. |
| Enable file logging | Write log output to files on disk in addition to the WebSocket stream. |
| Log directory | Where log files are stored. Leave blank for the platform default (~/Library/Logs/citrasense/ on macOS). |
Image Storage
| Setting | Description |
|---|---|
| Keep captured images | Retain raw FITS files after upload. By default, images are deleted after successful upload to save disk space. Enable this for post-processing or archival. |
Development
| Setting | Description |
|---|---|
| Use Dummy API (Local Testing) | Replace the live Citra API connection with a local mock server. Useful for testing CitraSense without an internet connection or API account. When enabled, the API tab shows a warning and its settings are ignored. |
Paths & Files
A read-only table at the bottom of the Advanced tab shows the file system paths CitraSense is using for this session. Each path has a clipboard button to copy it.
| Path | What it points to |
|---|---|
| Config file | The config.json file where all settings are persisted |
| Log file | The current day’s log file (shown only when file logging is enabled). A download button lets you save the log directly from the browser. |
| Images directory | Where captured FITS files are stored |
| Processing directory | Where intermediate pipeline files are written |
| Astrometry indexes | The directory containing astrometry.net index files (shown only when configured) |
These paths are read-only and are shown for reference and troubleshooting. To change the log or data directories, use the Logging and Image Storage settings above.
Saving Changes
All configuration tabs share a single Save Configuration button fixed at the bottom of the page. Pressing it saves every setting across all tabs at once. The button shows a spinner while saving.
The config file path is displayed next to the button for reference (e.g., ~/Library/Application Support/citrasense/config.json on macOS).
Some changes take effect immediately (like log level), while others (like switching hardware adapters) may require a reconnect or restart.