Telescope Sensor Detail
The telescope sensor detail page is where every mount, optics, autofocus, and per-task control lives. Open it from the Monitoring tab by clicking a telescope sensor’s card header or its Open button. The page URL is /sensors/<sensor-id>.
The page is laid out top-to-bottom:
- Header — sensor name, hardware pills, operational switches, init status, Reconnect.
- Robotic Session — nightly dusk-to-dawn lifecycle (only when Robotic is on).
- Telescope card — adapter, pointing readouts, cable wrap, pointing model, mount controls.
- Optics card — config health, preview, camera controls, filters, focus, autofocus, HFR health.
- Active Tasks — Imaging → Processing → Submission pipeline.
- Scheduled Tasks — assigned tasks for this telescope.
Header
The page header shows the sensor name, its modality icon, hardware connection pills (mount / camera / focuser / filter wheel), per-telescope operational switches, the init-state badge if the sensor is not fully connected, and a Reconnect button.
Operational switches
| Switch | What it controls |
|---|---|
| Scheduling | Citra Space assigns observation tasks to this telescope while on. Turn off to stop receiving new tasks for this scope. |
| Processing | Daemon executes queued tasks (imaging, processing, uploading). Turn off to pause execution while keeping the API connection alive. |
| Robotic | Enables the robotic observing session: unpark at dusk, run start-of-night autofocus, park at dawn. |
A Cable Wrap pill appears next to the switches when the mount has reached its cable-wrap warning or emergency limit.
Init status badge and Reconnect
When the sensor is fully connected, the init badge is hidden. While the daemon is bringing the adapter up — or after a failure — one of these badges appears:
| Badge | Meaning |
|---|---|
| Pending (gray) | Adapter has not started connecting yet. |
| Connecting… (blue, spinning) | Adapter is establishing a connection right now. |
| Connect failed (red) | Last connection attempt raised an error. Hover for the message. |
| Connect timed out (red) | Last attempt did not finish before the deadline. |
The Reconnect button bounces the adapter — it disconnects and re-establishes hardware. Use it when a connection looks healthy from the outside but has flaked. Disabled while a connect is already in flight.
Robotic Session
The Robotic Session card appears when the Robotic switch is on. It tracks the nightly observing lifecycle and shows what the session is doing right now.
| State | Badge | What’s happening |
|---|---|---|
| Daytime | Gray | Telescope is parked. Countdown shows time to the next dark window. |
| Starting Up | Blue | Sun dropped below the twilight threshold. CitraSense is unparking, running pointing calibration / autofocus, and otherwise preparing. |
| Observing | Green | Tasks are being executed. Countdown shows time remaining in the dark window. |
| Shutting Down | Yellow | Dawn approaches. CitraSense finishes the current task, parks the mount, and shuts down for the day. |
The card surfaces the Sun altitude, the Threshold (Civil / Nautical / Astronomical), the Dark Window start–end times with total duration, and an Activity line during startup and shutdown (e.g., “Unparking mount”, “Running autofocus”). A spinner runs during startup and shutdown.
Telescope Card
The Telescope card shows the mount’s current state and exposes direct mount controls for adapters that support them.
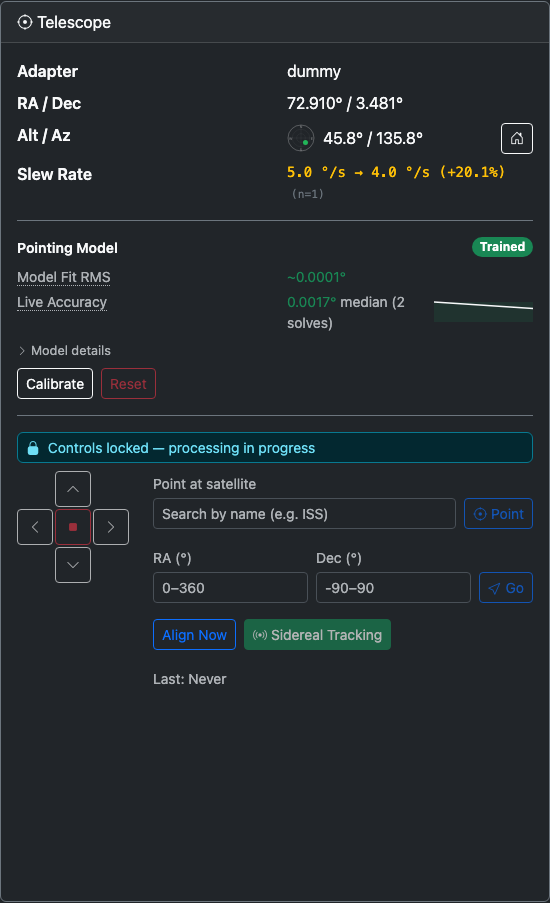
Status fields
| Field | Description |
|---|---|
| Adapter | The active hardware adapter for this sensor (Direct, N.I.N.A., KStars, INDI). |
| RA / Dec | Current telescope pointing in degrees. |
| Alt / Az | Current altitude and azimuth in degrees, with a polar diagram. The dot shows where the telescope is pointing — center is zenith, edge is horizon, North at top. A Home button (house icon) on this row sends the mount to its home position. |
Cable Wrap
If the mount tracks cable rotation, a progress bar shows the cumulative cable wrap in degrees. The bar fills toward the soft limit (where new tasks are paused) and the hard limit (where motion is aborted).
- Unwind — Reverses the mount rotation to unwind cables. Appears when wrap exceeds 5°.
- Reset — Zeros the counter after you manually straighten cables.
When an unwind is in progress, the bar animates with a striped fill.
Altitude Limits
When the mount reports altitude limits, they appear as the minimum (horizon) and maximum (overhead) degrees the mount will accept.
Config Health
Telescope-related configuration checks appear here. Each check compares a value you have configured against what the hardware actually reports. When they differ significantly, a yellow warning shows the discrepancy as configured → observed (+N%).
Currently tracked:
| Check | What it compares |
|---|---|
| Slew Rate | Configured maximum slew rate vs. the rolling mean of observed slew times. Shows the sample count (n=N) used to compute the average; warnings appear only once enough samples have been collected. |
More checks will appear as the adapter collects data during a session.
Pointing Model
For Direct Hardware adapters, the Pointing Model section shows the live state of the multi-point pointing model:
| Element | Description |
|---|---|
| State badge | Untrained / Partial / Trained / Degraded. |
| Model Fit RMS | The average residual error of the pointing model in degrees, color-coded green/yellow/red against your field of view. |
| Live Accuracy | Median pointing error measured from recent plate solves, with a count of contributing solves and a sparkline chart of the trend. The chart’s green/yellow/red bands match the same FOV-relative thresholds. |
| Model details (expandable) | Leveling errors (N-S and E-W), model terms (IE, CA, NPAE depending on fit), and calibration point count. |
If the live accuracy drifts above the FOV-relative threshold, the badge flips to Degraded and a “Recalibration recommended” alert appears.
Controls:
- Calibrate — Runs an automated multi-point calibration sequence across the sky. During calibration, a progress bar shows the current step (e.g., “5 / 25”) with a Cancel button.
- Reset — Clears all calibration data (requires confirmation). Disabled while imaging is active.
Mount Controls (Direct Hardware adapters)
Additional mount controls appear at the bottom of the Telescope card for adapters that support direct control:
- Jog pad — 3×3 grid of N/S/E/W buttons for manual mount movement. Press and hold to move; release to stop. Center button stops all axes immediately. Works with both mouse and touch.
-
Point at satellite — Search the satellite catalog by name (start typing — for example “ISS” or “DIRECTV 14” — and matches appear in a dropdown). Pick a result to load its live state. A chip shows its current altitude and azimuth, colored green when above the configured horizon limit, yellow when below it, and red when below the horizon. The action button reads Track on mounts that support custom tracking rates (slew and follow the satellite) and Point on mounts that do not (slew once — press again to re-point). A “View on Citra” link opens the satellite’s page on citra.space when the app URL is configured. Click clear to drop the selection.
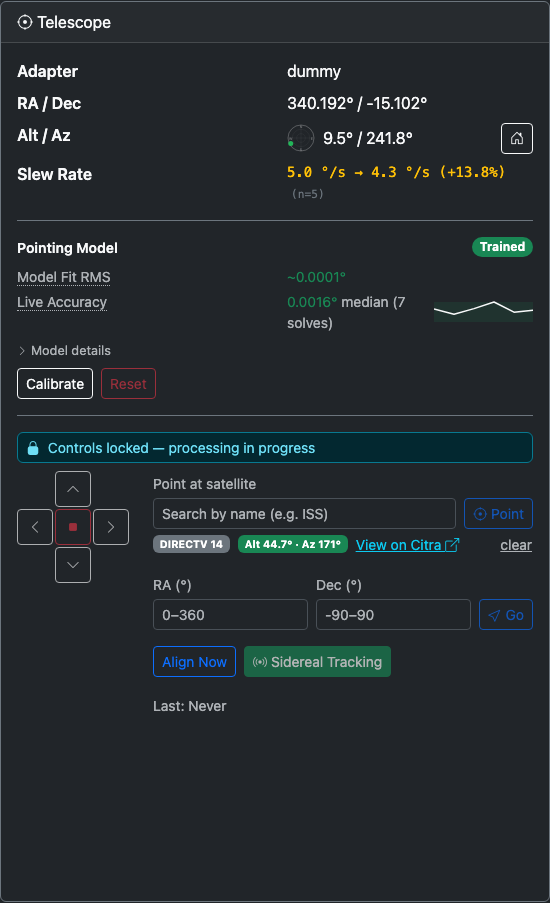
- Go To — Enter target RA (0–360°) and Dec (−90–90°), press Go to slew. The button is disabled while the mount is slewing or busy.
- Align Now — Triggers a plate-solve alignment to sync the mount model. The button changes to Cancel Alignment while running and shows progress text and a spinner; below it the last alignment timestamp is displayed when idle.
- Sidereal Tracking — Toggle the mount’s sidereal tracking on or off.
- Slewing pill — Animated badge that appears whenever the mount is in motion.
When the system is busy (imaging, autofocus, alignment), all mount controls lock and an info banner explains why: “Controls locked — Imaging in progress” or similar.
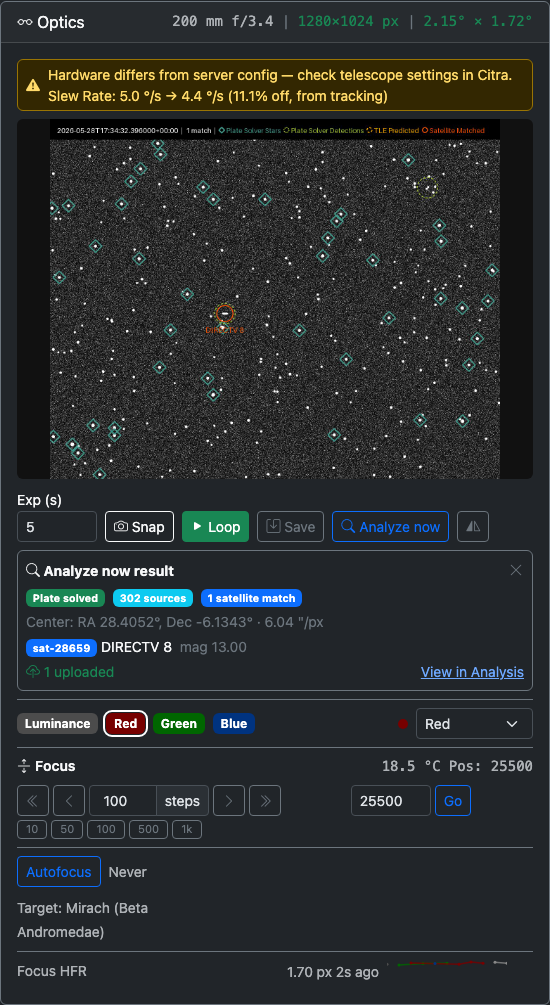
Optics Card
The Optics card covers the camera, filter wheel, focuser, autofocus, and focus health — everything on the optical path.
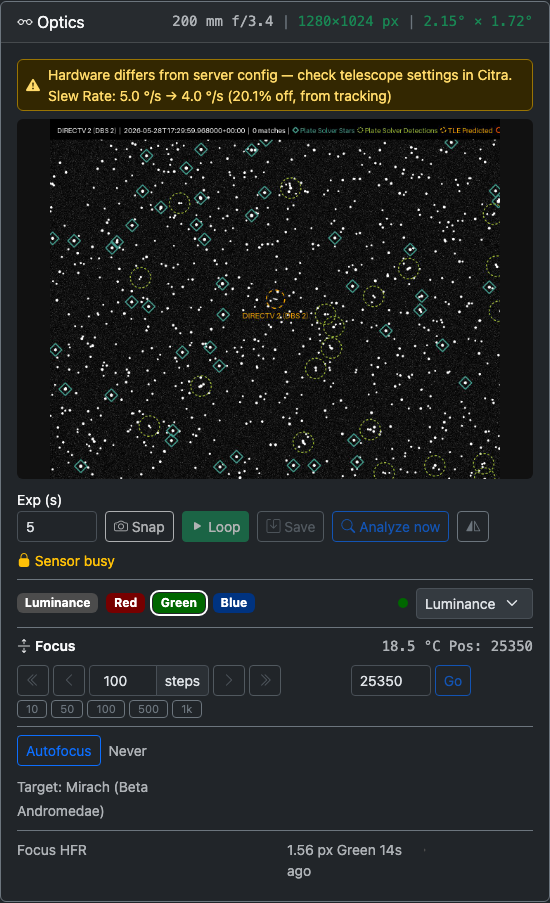
Config Health
A compact strip in the card header shows key optical parameters: focal length, sensor resolution, and field of view. Values are colored:
- Green — matches the hardware (or the server config it was checked against).
- Yellow — differs from configuration; the observed value appears next to the configured one with the percent difference.
- Muted — pending an observation to verify.
A warning banner appears in the card body listing any failing checks, including pixel scale and sensor resolution mismatches that aren’t shown in the header strip.
Preview Image
The preview area shows the most recent image captured by this telescope’s camera. Click it to open a fullscreen lightbox.
Camera Controls (Direct Hardware adapters)
| Control | Action |
|---|---|
| Exp (s) | Preview exposure time in seconds (0.01–30, decimal values allowed). |
| Snap | Take a single preview exposure. |
| Loop | Start continuous preview exposures (button turns red; click again to stop). |
| Save | Capture a full FITS image at the current exposure. |
| Analyze now | Capture one frame at the current exposure, run it through the processing pipeline (plate-solve, source extraction, satellite matching), and upload any matches. Useful for one-off “what’s in the field?” checks without scheduling a task. Disabled while another capture, autofocus, or imaging task is in flight. When the job finishes, an inline result panel shows whether the frame plate-solved, the field center and pixel scale, source count, and a list of satellite matches with their magnitudes. Click the × on the panel to dismiss it. See screenshot below. |
| Flip | Horizontally flip the preview — useful when a diagonal mirror inverts the image. |
A Sensor busy indicator appears in place of these controls when an imaging task is in progress.
Analyze now is only available on adapters that support ad-hoc captures. Currently that’s the Direct Hardware adapter; N.I.N.A. and KStars don’t yet expose a free-form capture endpoint, so the button will return “this sensor’s adapter doesn’t support ad-hoc captures.”
Filter Wheel
When filters are configured, a row of color-coded badges shows every enabled filter. The current filter has a white outline. For Direct Hardware adapters, a dropdown next to the badges lets you change the filter manually.
Focus Controls
The Focus section appears when a focuser is connected. The header shows the current position and temperature (when reported).
| Control | Action |
|---|---|
| Coarse in/out (double chevron) | Move the focuser by 10× the step size. |
| Fine in/out (single chevron) | Move by 1× the step size. |
| Step size | Number input plus quick-select buttons: 10, 50, 100, 500, 1k. |
| Absolute Go-To | Enter a target position and press Go. |
| Stop (red) | Abort an in-progress move (appears only while the focuser is moving). |
A “Moving…” indicator with a spinner shows while the focuser is in transit.
Autofocus
When the adapter supports autofocus, the Autofocus section exposes:
- Autofocus button — Triggers a manual run. Changes to Cancel AF while running.
- Last autofocus — Timestamp of the last successful run.
- Per-filter results — After a multi-filter run, each filter’s best position and HFR are listed in the filter’s color.
- V-curve chart — Plots HFR (Half-Flux Radius) vs. focuser position for each filter, showing the characteristic V-shape autofocus uses to find best focus. Each filter is a separate colored polyline.
- Target — The target the autofocus routine will slew to (configured in the Autofocus config tab as a preset star or custom coordinates).
- Next in — Countdown to the next scheduled autofocus, when autofocus scheduling is enabled.
When a run completes or fails, a toast notification appears with the result (succeeded with best position, or failed with the reason).
Focus HFR Health
The Focus HFR readout tracks focus quality over time:
| Element | Description |
|---|---|
| Focus HFR | Median half-flux radius from the most recent measurement in pixels, plus the filter and “Xs ago” age. Color-coded green/yellow/red against the autofocus baseline. |
| Sparkline | Mini chart of HFR trend over recent observations, with one polyline per filter. Green/yellow/red bands match the refocus-threshold zones. |
| Baseline | The HFR established during the last autofocus run, used as the reference. |
| Refocus threshold | When auto-refocus is enabled, shows the percentage increase that will trigger an automatic refocus. |
If neither a baseline nor a recent reading is available, the panel prompts “Run autofocus to calibrate”.
Active Tasks
The Active Tasks pipeline shows real-time progress for this telescope’s task flow. Tasks move left to right through up to three stages.

Pipeline header
The card header shows cumulative session counts for this telescope:
- Completed — total tasks that have finished all stages successfully
- Satellites — number of satellite identifications made by the satellite matcher
- Obs — observation data uploads to the Citra Space API
- Img — image file uploads
Pipeline stages
| Stage | Icon | What happens |
|---|---|---|
| Imaging | Camera | The telescope slews to the target, configures the camera, and captures exposures. Each task shows the target name, elapsed time, and a status message (e.g., “Exposing frame 3 of 5”). |
| Processing | Gear | Captured images pass through the processing pipeline: calibration, plate solving, source extraction, photometry, satellite matching. A per-stage success/failure progress bar shows the ratio. Only visible when processors are enabled. |
| Submission | Cloud | Processed results are uploaded to the Citra Space API. A three-color bar shows observation uploads (green), image-only uploads (yellow), and failures (red). |
Each stage box shows a count badge for tasks currently in that stage, a progress bar, and the list of tasks with their elapsed time and status. On error, the status line includes a retry countdown (e.g., “Upload failed, retrying in 45s…”).
Scheduled Tasks
The Scheduled Tasks card lists every observation task the Citra Space scheduler has assigned to this telescope.
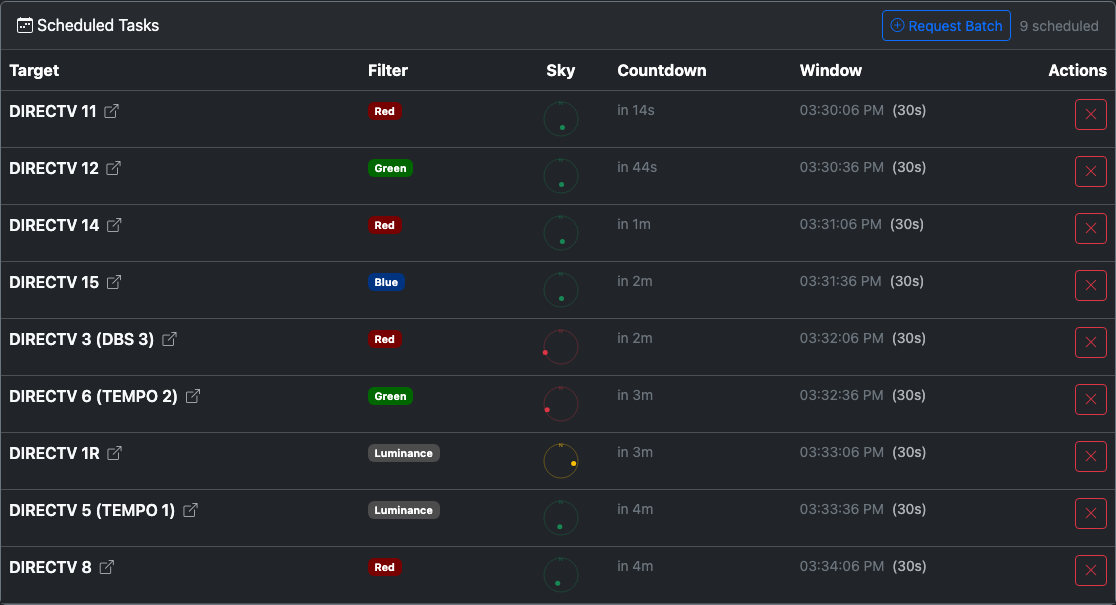
| Column | Description |
|---|---|
| Target | The satellite or target name. When the Citra app URL is configured and the task carries a satellite ID, the name links to the satellite page on citra.space (opens in a new tab). |
| Filter | The assigned filter, shown as a color-coded badge. |
| Sky | A miniature polar compass showing where the target sits in the sky. Center is zenith, edge is horizon, North at top. Dot color: green above the minimum elevation, yellow within 10° of the limit, red below it. A dashed ring marks your configured minimum elevation. Hover for exact altitude, azimuth, trend, peak altitude, and estimated slew time. |
| Countdown | Time until the observation window opens — or closes, if the task is active. |
| Window | The start time plus window duration (hidden on small screens). An overlap badge appears when this window opens before the previous task’s window closes. |
| Actions | A Cancel button (×) cancels the task on the Citra Space server. Hidden for the active task. |
Active tasks are highlighted. Completed and cancelled tasks are removed on the next poll cycle.