Operating CitraSense
This guide walks through a full observing session with CitraSense: getting the telescope aligned and focused, pulling a task from the Citra Space queue, and reviewing the result afterward. By the end you’ll know which controls to reach for and when to touch them.
Unattended operation (the robotic, walk-away mode) is covered separately. This guide assumes you’re at the dashboard.
For reference material on any section, see Monitoring, Telescope Sensor Detail, Configuration, and Analysis.
Before you start
Make sure the following are already in place:
- CitraSense is installed and running at http://localhost:24872 (or
http://citrasense-{name}.localon a Pi). See Getting Started if not. - Your telescope is registered in the Citra Space app. See Add and Manage Telescopes to walk through it.
- The API is connected. On Configuration → API, your endpoint, token, and telescope ID are set. The TLEs badge in the status bar is green (25,000+ elsets loaded).
- Hardware is connected. On the telescope’s Configuration → Hardware tab, you’ve picked an adapter (Direct Hardware, N.I.N.A., KStars, or INDI — the Adapters page has a comparison table). The telescope’s hero card on Monitoring shows green mount / camera / focuser pills.
- A dark sky — or at least nautical twilight. You can do most of this guide against a bright sky, but plate solving needs stars.
Open the dashboard on the Monitoring tab and click your telescope’s Open button to jump to its sensor detail page — that’s your console for the rest of this session.
Part 1 — Get the telescope ready
Before CitraSense can start pulling satellite passes, the scope has to be genuinely ready: aligned, focused, and with calibration masters on disk. How you get there depends on your hardware adapter.
If you’re on N.I.N.A., KStars, or INDI, skip the rest of Part 1. In those configurations CitraSense is driving your existing control app — alignment, focus, calibration frames, and general scope readiness stay your responsibility in that app’s native workflow. Do your usual startup routine (park → polar align / pointing align → focus → flats), then jump straight to Part 2 — Run the session once the mount is tracking and the stars are sharp.
The rest of Part 1 is a hands-on walkthrough for operators on the Direct Hardware adapter, where CitraSense owns the full prep flow end to end.
Capture calibration frames (optional — timing matters)
Calibration frames (bias, darks, flats) aren’t captured during an observing run — they go in ahead of time, and CitraSense applies them automatically during processing. Imaging still works without them, but photometry degrades.
Skip this step if your current masters are still valid. You don’t capture calibration every night.
When to do this: Flats need a bright twilight sky, so they have to happen at dusk before the rest of Part 1 (or at dawn after your session). Bias and darks can be taken any time — a cloudy night, the dome closed, even during the day.
Typical cadence:
- Bias: once per camera setup, re-capture if you change gain or offset.
- Darks: one set per exposure time at your cooling setpoint — re-capture when the setpoint changes, or every couple of months.
- Flats: one set per filter — re-capture when dust shifts on the sensor, filter wheel, or optics.
Capture masters through the per-telescope Configuration → Calibration tab. The tab also shows where masters are stored on disk and how they’re matched at runtime. On the N.I.N.A. adapter with a trained Flat Wizard profile, the Run Flat Wizard button captures flats per-filter without operator action; pair it with the “Automatically capture flats during flat windows” switch for hands-off refreshes.
Reset the pointing model if the scope has moved
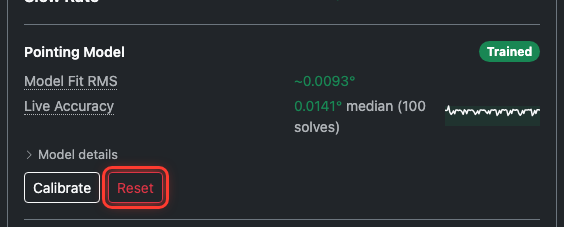
If this is a fresh site, a new physical setup, or anything that changed the mount’s relationship to the sky since last night, clear the old pointing model first. A stale model applied to the wrong geometry makes pointing worse, not better.
On the telescope detail page, in the Telescope card’s Pointing Model section, press Reset. Confirm. The model state drops back to Untrained. If nothing has moved since your last successful night, skip this and keep the model you’ve got.
Find some stars
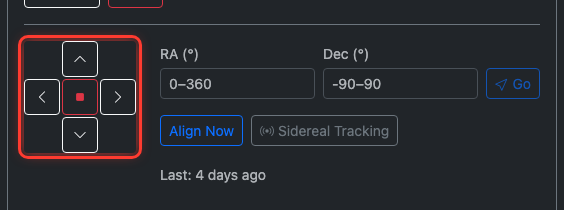
Point the scope at a patch of sky with visible stars. You don’t need to know exactly where you are — the mount doesn’t yet. Use the Jog Pad at the bottom of the Telescope card (N/S/E/W directional buttons, press and hold) to slew.
On the same page’s Optics card, press Snap with a short exposure (say, 2 seconds) to check what the camera sees.

Iterate: jog, Snap, jog, Snap. Once you have stars in the frame — any stars — you’re ready to align.
No frame coming back? Check the camera pill in the sensor card header — if it’s not green, the camera isn’t connected. The log panel at the bottom will show you why.
Align
With stars in the frame, press Align Now in the Telescope card’s mount controls. CitraSense takes one frame, plate-solves it against the whole-sky catalog, and syncs the mount to the solved position.
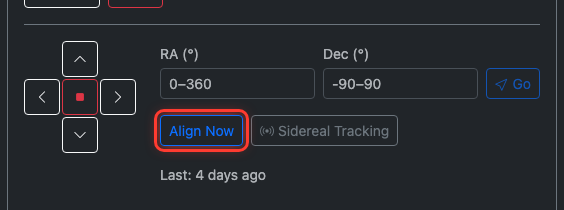
That’s it — the mount now knows where it’s pointing. From here, Go To actually lands on targets.
Focus
Time to sharpen up. The Optics card’s Autofocus section has a big button that kicks off the routine.
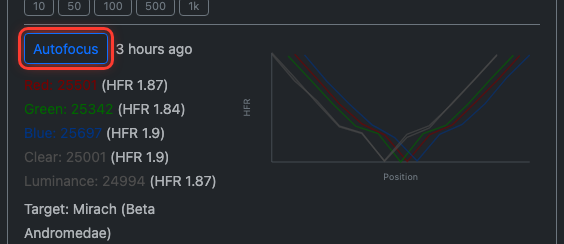
CitraSense’s autofocus target is configured in Configuration → Autofocus as a preset star (e.g., Mirach, Vega) or custom coordinates. Leave the default. The routine will:
- Slew to the autofocus target (Go To works now because you aligned).
- For each enabled filter: step the focuser through a coarse sweep, compute HFR at each stop, fit a hyperbola to the curve, and land on the minimum.
- Record each filter’s best focus position so it can be reapplied mid-task.
Watch the Optics card while it runs:
- A V-curve chart builds up live, with one curve per filter color.
- Per-filter results list the best position and HFR for each.
- At the end, the Focus HFR Health readout shows the baseline HFR — that’s your reference point for the rest of the night, used by HFR-triggered refocus during the session.
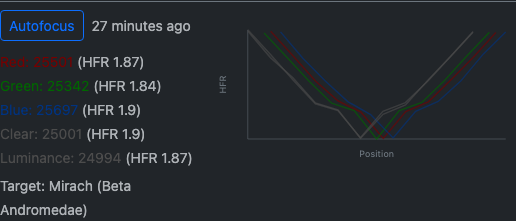
A full five-filter sweep takes about a minute. If you want to refocus a single filter only (say, you bumped the focuser), use the manual step controls under Focus to tweak by hand.
Build the pointing model (optional)
One Align Now sync is enough to get started, but a full pointing model is better — it corrects systematic errors (leveling errors, cone error, tube flex) across the whole sky, not just near the patch you aligned on. You have two ways to get there:
Run Calibrate now. In the Pointing Model section, press Calibrate. The routine slews to a sequence of points across the sky, takes a frame at each, plate-solves it, and compares the solved center to the commanded center. Residuals get fit into a model. A progress bar tracks the run with a step counter (e.g., “5 / 25”) and a Cancel button. When it finishes, the Pointing Model badge flips to Trained and the Model Fit RMS and Live Accuracy readouts update with the new numbers. Expand Model details to see the per-term breakdown (leveling errors, cone angle, non-perpendicularity).
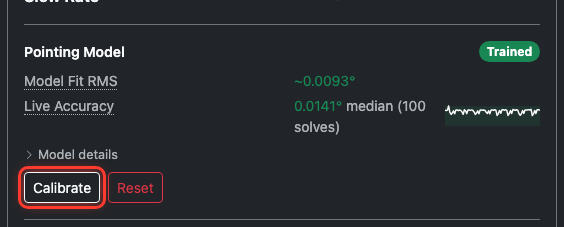
Let it build itself. Skip the up-front calibration and start observing. Every real task’s pointing-convergence loop contributes a plate-solved data point to the model. The Live Accuracy sparkline shows it improving as the night goes on. This is the lazy path — the first few tasks will converge in more iterations than later ones, but you’re imaging sooner.
Which to pick? If you’ve got time before your first pass and want tight pointing from task one, run Calibrate. If a pass is starting in two minutes, skip it and let the model self-train.
Part 2 — Run the session
From here, everything is the same on every adapter. You’ve got a telescope that’s aligned and focused, and CitraSense is connected to the Citra Space API. It’s time to pull some tasks.
Pull a task and watch it run
On the telescope’s hero card (Monitoring tab) or its detail page header, flip the Scheduling switch on. Leave Robotic off for now — we want to drive this manually. These switches are per-telescope, so they only affect this scope; other sensors on the same host stay where you left them.

The Citra Space scheduler assigns tasks automatically. Open the telescope’s detail page — within a poll cycle or two, the Scheduled Tasks card lists every pass the scheduler has handed out for this telescope:
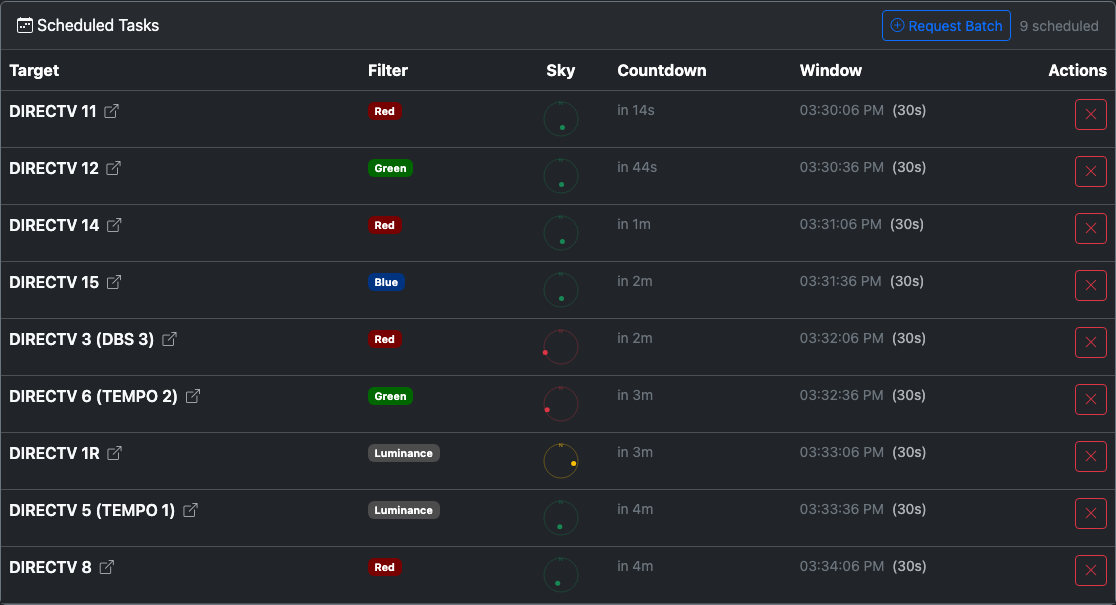
| Column | What you’re looking at |
|---|---|
| Target | Satellite name (links to the satellite page on citra.space when an app URL is configured) |
| Filter | Which filter the pass was assigned |
| Sky | A mini sky compass showing where the target sits right now. Green = well above minimum elevation, yellow = close to the limit, red = below. A dashed ring marks your configured minimum elevation. |
| Countdown | Time until the observation window opens |
| Window | Start time plus window duration. An overlap badge appears when a window opens before the previous task’s window closes. |
| Actions | Cancel (×) — removes the task from the server and your queue |
Pick the first task with a short countdown. When the window opens, CitraSense automatically picks it up.
Flip the Processing switch on. This is what tells the daemon it’s allowed to start executing tasks for this telescope. Now watch the Active Tasks card below Scheduled Tasks. Your task moves through three stages from left to right:

Imaging stage
CitraSense slews to the predicted RA/Dec, rotates the filter wheel to the assigned filter, applies that filter’s focus offset, and runs the exposure. The preview updates with the final image.
Processing stage
The task hops into the Processing column. Six processors run in order:
- Calibration — applies bias/dark/flat masters if available.
- Plate Solver — astrometry.net computes a WCS solution. Without this, nothing else is possible.
- Source Extractor — SExtractor detects every bright pixel cluster.
- Photometry — cross-matches stars against the APASS catalog, computes a zero-point.
- Satellite Matcher — propagates TLEs to the exposure midpoint and matches predicted positions to detected sources.
- Annotated Image — generates a JPEG overlay with stars, matched satellites, and the target highlighted.
The per-processor progress bar shows success/failure rates as the session grows.
Submission stage
The result goes up to the Citra Space API. You’ll see a green tick for observation uploads, yellow for image-only, red for failures.
Part 3 — Review and next steps
Review the task
Once the first task finishes, switch to the Analysis tab. Your completed task is at the top of the task list.
Click the row to expand the detail panel:
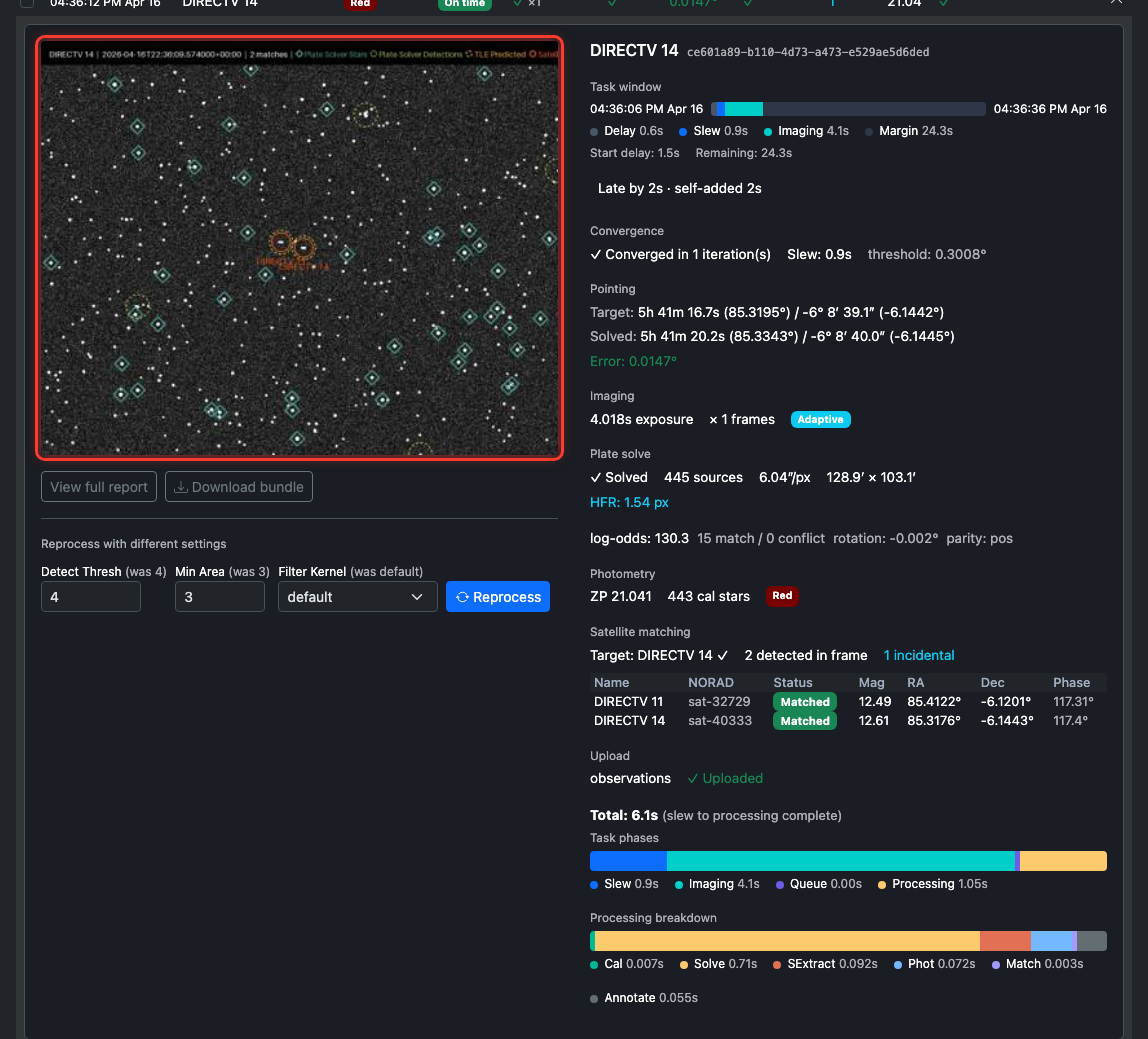
- Annotated image on the left — click to open fullscreen. Stars and satellites are overlaid; the target is highlighted.
- Reprocess panel lets you re-run the pipeline against the same frame with different SExtractor settings (detection threshold, minimum area, convolution kernel). Great for tuning.
- Window bar on the right — shows how the observation window was spent (delay → slew → imaging → margin).
- Convergence, Pointing, Imaging, Plate solve, Photometry, Satellite matching — full diagnostics from every processor.
- Upload — whether the result made it to Citra Space, and why not if it didn’t.
If the task didn’t find its target, the annotated image tells you why: the satellite may have been outside the predicted position (TLE drift), blocked by a cloud, or landed off the sensor (pointing issue). The detail panel has the data to diagnose it.
Keep driving, or hand off
At this point you have two choices.
Stay hands-on. Re-run autofocus when HFR drifts off baseline (the Focus HFR sparkline turns yellow then red against the baseline), and cancel any task that looks troubled (weather, elevation, whatever). The scheduler keeps your queue filled.
Hand off. When you’re confident things are running cleanly, flip Robotic on the telescope’s card. That enables the nightly lifecycle: unpark at dusk, run start-of-night autofocus and pointing calibration (per your Robotic config), observe through the dark window, park at dawn. The Robotic Session card on the detail page shows what the session is doing right now. That’s the “walk-away” mode — worth a separate session to set up properly.

For tonight, staying hands-on is the right call. You’ll learn what every number on the dashboard means, and you’ll recognize the weird cases when they come up.
Things to check between sessions
- Dark, flat, bias masters — refresh monthly or when conditions change. On Direct Hardware, capture through the telescope’s Configuration → Calibration tab (see Capture calibration frames in Part 1 — flats need dusk or dawn). On N.I.N.A. the Flat Wizard automation can handle flats hands-off. On KStars and INDI, use your adapter’s native calibration tools — CitraSense applies whatever masters it finds at processing time.
- Pointing model (Direct Hardware) — rebuild after re-leveling the mount, a teardown, or a large temperature shift. Other adapters rely on the mount’s own alignment scheme instead.
- Disk space — raw FITS and processing artifacts add up fast. Site-level Pipeline → Processing output retention controls how long bundles stick around; per-sensor Advanced → Keep captured images controls raw FITS retention.
- Log files — CitraSense rotates daily logs at
~/Library/Logs/citrasense/(macOS). Paths and copy buttons are on Configuration → Advanced → Paths & Files.
Learn more
- Getting Started — install and launch CitraSense
- Raspberry Pi image — headless field deployment
- Telescope Sensor Detail — every control on the telescope detail page
- Configuration reference — every setting explained
- Monitoring reference — the live dashboard in detail
- Analysis reference — post-session review tools